

The background plays a crucial role in enhancing the visual impact of a design. As a designer, you’ll likely find yourself frequently adjusting the background color when working in Adobe Illustrator.
Contents
- 1 How To Change Background Color in Adobe Illustrator
- 1.1 Method 1: Adjust Document Interface Background Color
- 1.2 Method 2: Modify Artboard Background Color
- 1.3 Method 3: Adjust Transparency Grid Background Color
- 1.3.0.1 Activities to Celebrate Mother’s Day Together
- 1.3.0.2 20 Mother’s Day Messages Unique to Show Mom You Care
- 1.3.0.3 Top 20 Creative Mother’s Day Gift Ideas
- 1.3.0.4 Brand Identity in POD: Crafting Your Unique Style
- 1.3.0.5 Photoshop Text Effects
- 1.3.0.6 These 10+ Free Embroidery Patterns for Your Business
How To Change Background Color in Adobe Illustrator
“Tip: When changing the color of the background in Illustrator, be sure to select the correct layer before making any changes. Otherwise, you may unintentionally change the color of other elements in your design.” – Websitebuilderinsider
Method 1: Adjust Document Interface Background Color
In the more recent version of Adobe Illustrator, the default document background is a dark gray. If you’re accustomed to the older or CS versions with a light background, you can modify the color through the Preferences menu.
- Step 1: Navigate to the top menu and choose Illustrator > Preferences > User Interface.
If you haven’t noticed already, my current background color is the darkest one.
- Step 2: Opt for one of the Brightness options, click on it, and observe how it appears on your document background.
Click OK once you’ve selected a color.
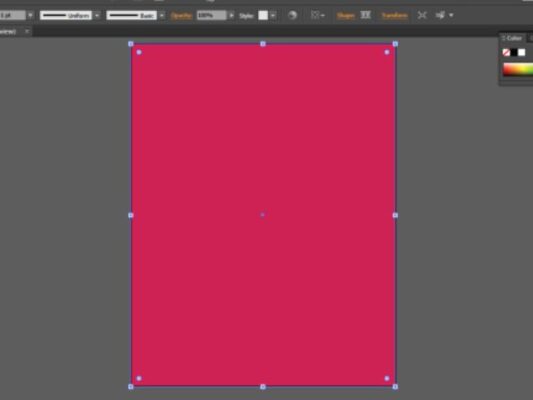
Method 2: Modify Artboard Background Color
The simplest way to add or change an artboard background color is by adjusting the color of a rectangle.
- Step 1: Pick the Rectangle Tool (keyboard shortcut M) and draw a rectangle matching the size of your artboard. The color should match the Fill color you used before.
- Step 2: Select the rectangle, double-click on Fill to open the color picker, or choose a color from the Swatches panel to alter the color.
You can lock the rectangle if you don’t want to accidentally move it. Simply select the rectangle and press Command + 2 to lock the shape (background). If you want to convert it into a background layer and lock it, go to the Layers panel and lock the layer.
Method 3: Adjust Transparency Grid Background Color
The white background you perceive doesn’t actually exist! When you create a document, the white background is transparent. You can activate the transparency grid view to visualize it.

- Step 1: Head to the top menu and select View > Show Transparency Grid (Shift + Command + D).
See? Your background is transparent. Sometimes we work in grid mode to avoid issues like having white text on a “white” background, making it impossible to see.
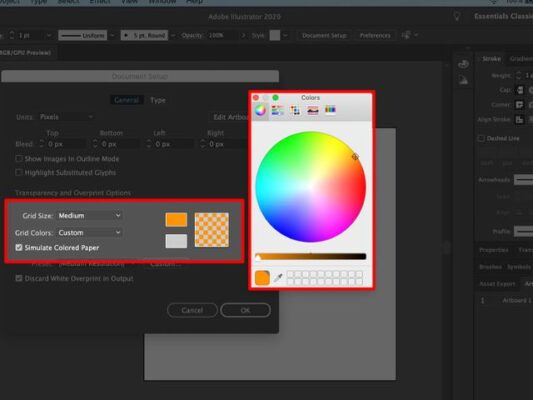
- Step 2: Go to the top menu again and select File > Document Setup. You’ll encounter Transparency and Overprint Options, allowing you to choose grid colors.
- Step 3: Click on the color box and select a fill color. After choosing a color, click the close window button, and observe the grid changing its color.
Use the Eyedropper to pick the same color for both options. (Alternatively, if you have a suitable color combination, you can choose two different colors.)
- Step 4: Activate Simulate Colored Paper and click OK.
Now the transparency grid will adopt the color you selected. Press Shift + Command + D to hide the transparency grid while still displaying the colored background.
“You’ll only be able to see the background color on the document itself. When you export the artboard, the background color wouldn’t show.” Illustrator How
Related posts