

Drawing roses is a delightful venture for beginners eager to explore their artistic talents. Despite their intricacy, roses offer an excellent starting point for honing your skills. In this guide, we’ll uncover essential tips tailored to beginners, empowering you to create captivating rose drawings with ease. Let’s embark on this creative journey together and unlock the secrets to crafting beautiful floral artwork.
Contents
- 1 How to Drawing Roses Guide for Beginners
- 1.1 Step 1: Draw an Elongated Circle
- 1.2 Step 2: Add a Line to the Left Side
- 1.3 Step 3: Add a Line to the Right Side
- 1.4 Step 4: Close the Cylinder
- 1.5 Step 5: Draw a Semicircle
- 1.6 Step 6: Add a Curving Line
- 1.7 Step 7: Draw an Opposing Curving Line
- 1.8 Step 8: Close the Gap
- 1.9 Step 9: Add the First Petal
- 1.10 Step 10: Draw an Opposing Petal
- 1.11 Step 11: Complete the Petal
- 1.12 Step 12: Add a Backside Petal
- 1.13 Step 13: Draw a Right Backside Petal
- 1.14 Step 14: Complete the Front Right Side Petal
- 1.15 Step 15: Complete the Front Left Side Petal
- 1.16 Step 16: Erase Overlapping Lines
- 1.17 Step 17: Add an Outer Left Side Petal
- 1.18 Step 18: Add a Front Right Side Petal
- 1.19 Step 19: Add a Front Left Side Petal
- 1.20 Step 20: Draw the Stem
- 1.21 Step 21: Add Details on the Inner Cone
- 1.22 Step 22: Add Details on the Backside of the Cone
- 1.23 Step 23: Add a Leaf
- 1.24 Step 24: Start Shading
- 1.25 Step 25: Complete Shading
- 2 Conclusion
- 3 Related Post
How to Drawing Roses Guide for Beginners
Step 1: Draw an Elongated Circle
Begin by sketching a circle that’s wider than it is tall, resembling a slightly squished puddle. The circle doesn’t have to be perfectly round; focus on capturing similar proportions.
Step 2: Add a Line to the Left Side
Extend a line downward from the left corner of the circle, slightly tilting it toward the center.
Step 3: Add a Line to the Right Side
Repeat the process on the opposite side, drawing a similar line from the right corner downward towards the center, ensuring there’s a slight space between the two vertical lines.
Step 4: Close the Cylinder
Connect the lines with a downward-curving line, completing a cylinder-like shape, as if viewing it from above.
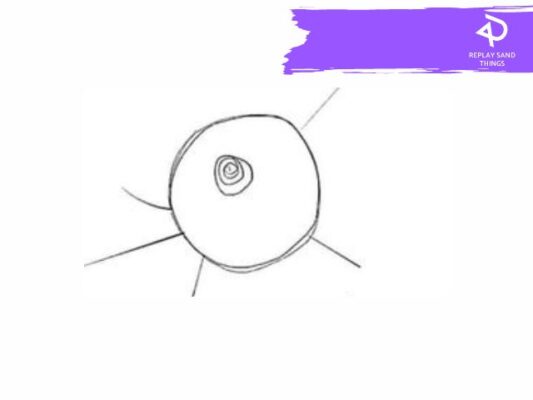
Step 5: Draw a Semicircle
Inside the initial circle, sketch a semicircle resembling a sunrise or sunset, with extra room on its sides compared to the initial circle.
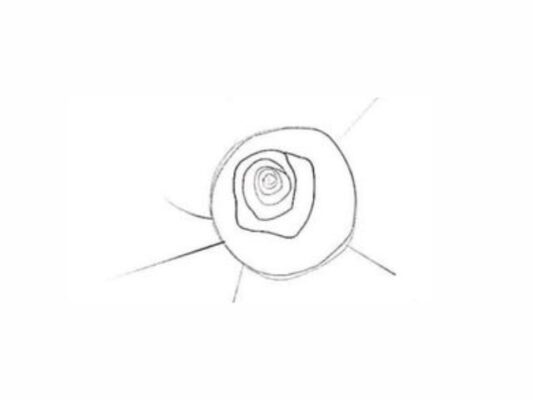
Step 6: Add a Curving Line
Draw a slightly curved line over the top of the semicircle, extending slightly past the middle point of the cylinder.
Step 7: Draw an Opposing Curving Line
Add another curving line opposite to the previous one, intersecting with it and being shorter in length.
Step 8: Close the Gap
Connect the gap between the two curving lines with a straight line.
Step 9: Add the First Petal
Begin adding petals, breaking them down into two lines and one curving line for dimension, ensuring a clear separation between them.

Step 10: Draw an Opposing Petal
Draw another petal behind the previous one, with its line hidden behind the first petal for a sense of depth.

Step 11: Complete the Petal
Finish the petal with a more curvy line, indicating its position behind the flower’s core.
Step 12: Add a Backside Petal
Draw a petal behind the core, maintaining a similar line anatomy to the first one drawn.
Step 13: Draw a Right Backside Petal
Repeat the process, adding a petal to the right side, slightly more hidden than the previous one.
Step 14: Complete the Front Right Side Petal
Connect the front right petal to the bottom of the core with a curved line.

Step 15: Complete the Front Left Side Petal
Similarly, connect the left petal to the bottom of the core with a slightly more curved line.
Step 16: Erase Overlapping Lines
Erase any overlapping lines of the core that extend over the front side of the petals.
Step 17: Add an Outer Left Side Petal
Draw a petal on the left side, ensuring the further blue line is shorter than the front one.
Step 18: Add a Front Right Side Petal
Continue adding petals, following the same method, with lines extending away from the core and connecting with a curved line.
Step 19: Add a Front Left Side Petal
Draw another petal, with a wider and flatter curve, indicating its position closer to the viewer.
Step 20: Draw the Stem
Sketch a stem below the flower, curving slightly for a realistic look.
Step 21: Add Details on the Inner Cone
Return to the cylinder and add petal details, with a larger line following the cylinder’s top and a smaller line underneath.

Step 22: Add Details on the Backside of the Cone
Repeat the arrangement on the backside of the cone, with a longer line on the left and a shorter one underneath.
Step 23: Add a Leaf
Draw a leaf beneath the flower, starting with a center line and shaping the leaf around it, adding slight jagged edges for realism.

Step 24: Start Shading
Begin shading the flower, focusing on areas where shadows would naturally fall, such as the corners towards the center.
Step 25: Complete Shading
Continue shading until satisfied, adding shadow where the stem meets the flower to enhance depth.
Conclusion
Congratulations on completing the step-by-step guide to drawing a rose! Throughout this tutorial, you’ve learned essential techniques to create a beautiful and lifelike representation of this iconic flower. From sketching the initial shapes to adding intricate details and shading, each step has contributed to the creation of a stunning floral artwork.
Drawing a rose may seem challenging at first, but with practice and patience, you’ve demonstrated that anyone can master this skill. By breaking down the process into manageable steps and understanding the anatomy of the flower, you’ve gained valuable insights that will serve you well in your future artistic endeavors.
Related Post
Fashion Style: Make Clothing Products Unique
Ideas Horror Art Services Design
Top 6 Skills For Success in E-commerce